 |
Source: marthastewart.com via Kristin on Pinterest |
. . . and decided that we needed to make a more permanent calendar, like Martha's. Somehow I convinced Chris because on the next trip to Home Depot I purchased some Rustoleum Magnetic paint primer and Chalkboard paint (in Fresco Red).
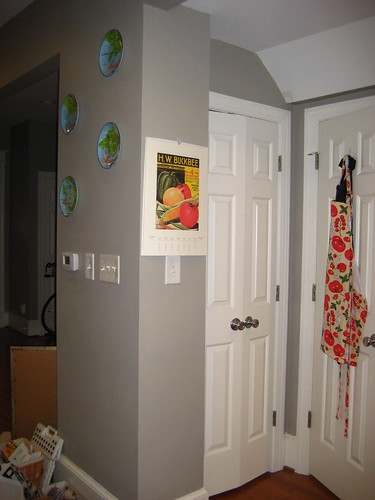
Here was our wall before, just gray with our old calendar-turned-wall-art.
We decided that we wanted to paint the entire "bump out" section, floor to ceiling, with magnet paint, and then cover it in chalkboard paint. I wasn't going to be like Martha and make the fancy, different colored squares because, let's be honest, I'm too indecisive. I figured this way we could use the space for a calendar, to-do lists, grocery lists, and for a drawing space for very-distant-future kiddos.
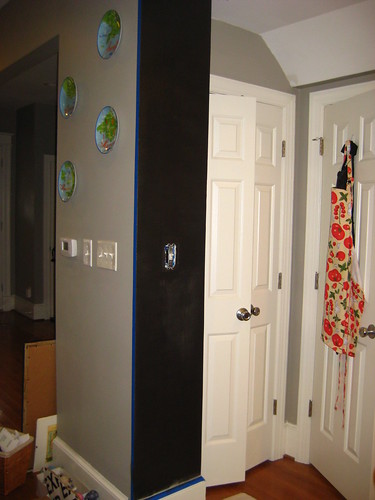
Step 1 was to paint on the magnetic primer. For those of you who have not played around with this fun paint, it's really not so fun during the actual painting process. First of all, if you buy this stuff get it shaken at the paint counter and then use it right away. Don't be like me. I bought it, let it sit around in our house for a few weeks, and then opened it only to find that all of the magnetic "stuff" had formed this huge mass at the bottom. Some quick internet searches revealed to me that you needed to get the stuff shaken, and shaken really well, or you could stir it for 15 minutes or more (and no, the directions on the box didn't mention that). So, I went back to Home Depot and had it shaken, and then still had to stir it. Ger. I repeat, if you buy this stuff get it shaken at the paint counter and then use it right away.
After running back to Home Depot and then stirring, I was finally ready to actually paint. The directions on the box state that you need to apply 2-3 thin coats. Lies, lies I tell ya! I think I probably applied 10 thin coats. Yup, I spent an entire day painting on a thin coat, waiting 30 minutes for it to dry, and then painting on another. After every coat dried, we'd test our magnets on it, only to find that it wasn't quite strong enough yet. After 10 coats, it was decently strong. And, I was tired of painting (the stuff smells too). As you can see from the "after" photo of the magnetic paint, there were also patches that didn't cover too well - Chris thought it was because of a poor dry-walling job . . .
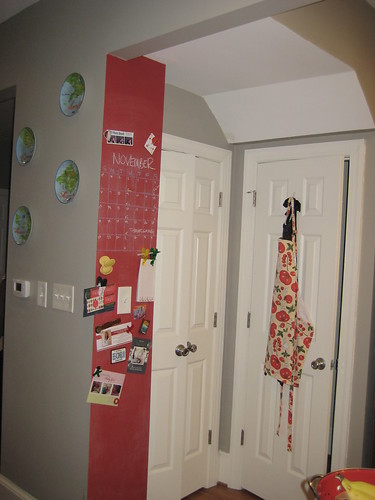
Then, I moved on to the chalkboard paint, which was much much easier. I chose the Fresco Red tintable chalkboard paint, and if you happen to chose it too, don't be alarmed if it looks hot pink. I was a little nervous about it too, but the Home Depot-paint-counter-guy told me it'd dry much darker, and it did. After about 8 thin coats of the chalkboard paint, the wall was done! (These instructions also told me 2-3 thin coats. Lies.)
The chalkboard paint instructions tell you to let the paint dry for 2-3 days, and then cover the entire surface with chalk for 7 days before wiping it clean with a damp cloth to "cure" it. It was really really hard to be patient and wait all of that extra time before I could actually use it, but I think it paid off. Here is our new wall now complete with our new chalk calendar and magnets!
By the way, if you haven't caught on to my habit of having a short project turn into a long one, this small project is a great example. I bought the paint around mid-September, I got around to actually painting the first week of October (before our vacation), we finally started using it last week, and I am just now blogging about. That's our life, I guess!
What do you think? I'm not too crazy about how our November calendar is set-up now, but at least I can erase it and start over! So, that's the story of our almost-two-month long fun chalk/magnet wall project!
I painted a door with chalkboard paint, and after some use, I was having trouble getting all the chalk to wash away (instead of black, it was really quite gray). Some diluted white vinegar (try 2 water:1 vin) will help with that. Just a tip in case you need it for the future!
ReplyDeleteThat is a GREAT tip, thank you!! As you might be able to see, there is already some chalk residue I couldn't wipe off!
ReplyDelete